I took another long break from this (about a week) and this progress has been made before that break, I just didn’t do the blog post…) Anyways, I had to refactor the code and add walls, and soon, I will be ready to start working on the game engine! I already knew I was gonna have to refactor but I held it off because I wanted fast results but the main thing needing a refactor was the button tools. I also updated the UI a tiny bit (changed the line graph color).
So how the button tools used to work is it had a tool manager, which would check the state of the mouse (a click, release, hover, or drag), then check which tool was selected, and then update that tool accordingly. The tool manager was getting really messy, and there was now a problem because for the wall tool I needed to add sub-tools. It kinda looked like this (emphasis on kinda):
ToolManager::update(MouseState ms)
{
  switch(ms)
  {
    case MouseState::HOVER:
    {
      // selected is a pointer to the selected tool
      switch(selected->getType())
      {
        case ToolType::VERTEX:
        {
          // Do stuff
          break;
        }
        case ToolType::LINE:
        {
          // Do stuff
          break;
        }
      }
      break;
    }
    case MouseState::CLICK:
    {
      // Similar stuff in MouseState::HOVER
      break;
    }
    // More mouse states
  }
}
This code looks pretty messy and doesn’t use the sweet sweet OOP features available. While it looks fine now, once you
actually begin putting the update stuff, that’s when it gets messy. So I changed it by adding a bool to each
Tool which allows it to know if it’s selected (I know I want to optimize but I’m willing to sacrifice a few bytes for
way better code) and then each tool handles its own update and drawing and the tool manager just calls them. The code
is looking a lot better now and it was easy to add sub tools. After implementing walls it looks like this:
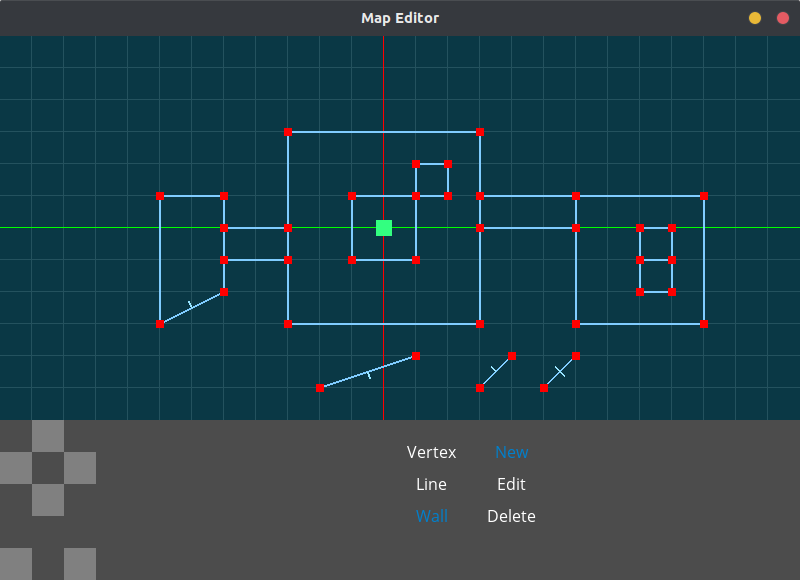
But you notice the ticks on those diagonal lines? Those are the wall markers, and they require using a lot of math. That’s because I want every tick to have the same distance. It’s easy for straight lines, just find the midpoint and shift right, left, up, or down. It is dang difficult for curved lines and I needed to finesse with some trigonometry even though I haven’t taken my trig course in school yet. I still know how sine and cosine work and that’s good enough.
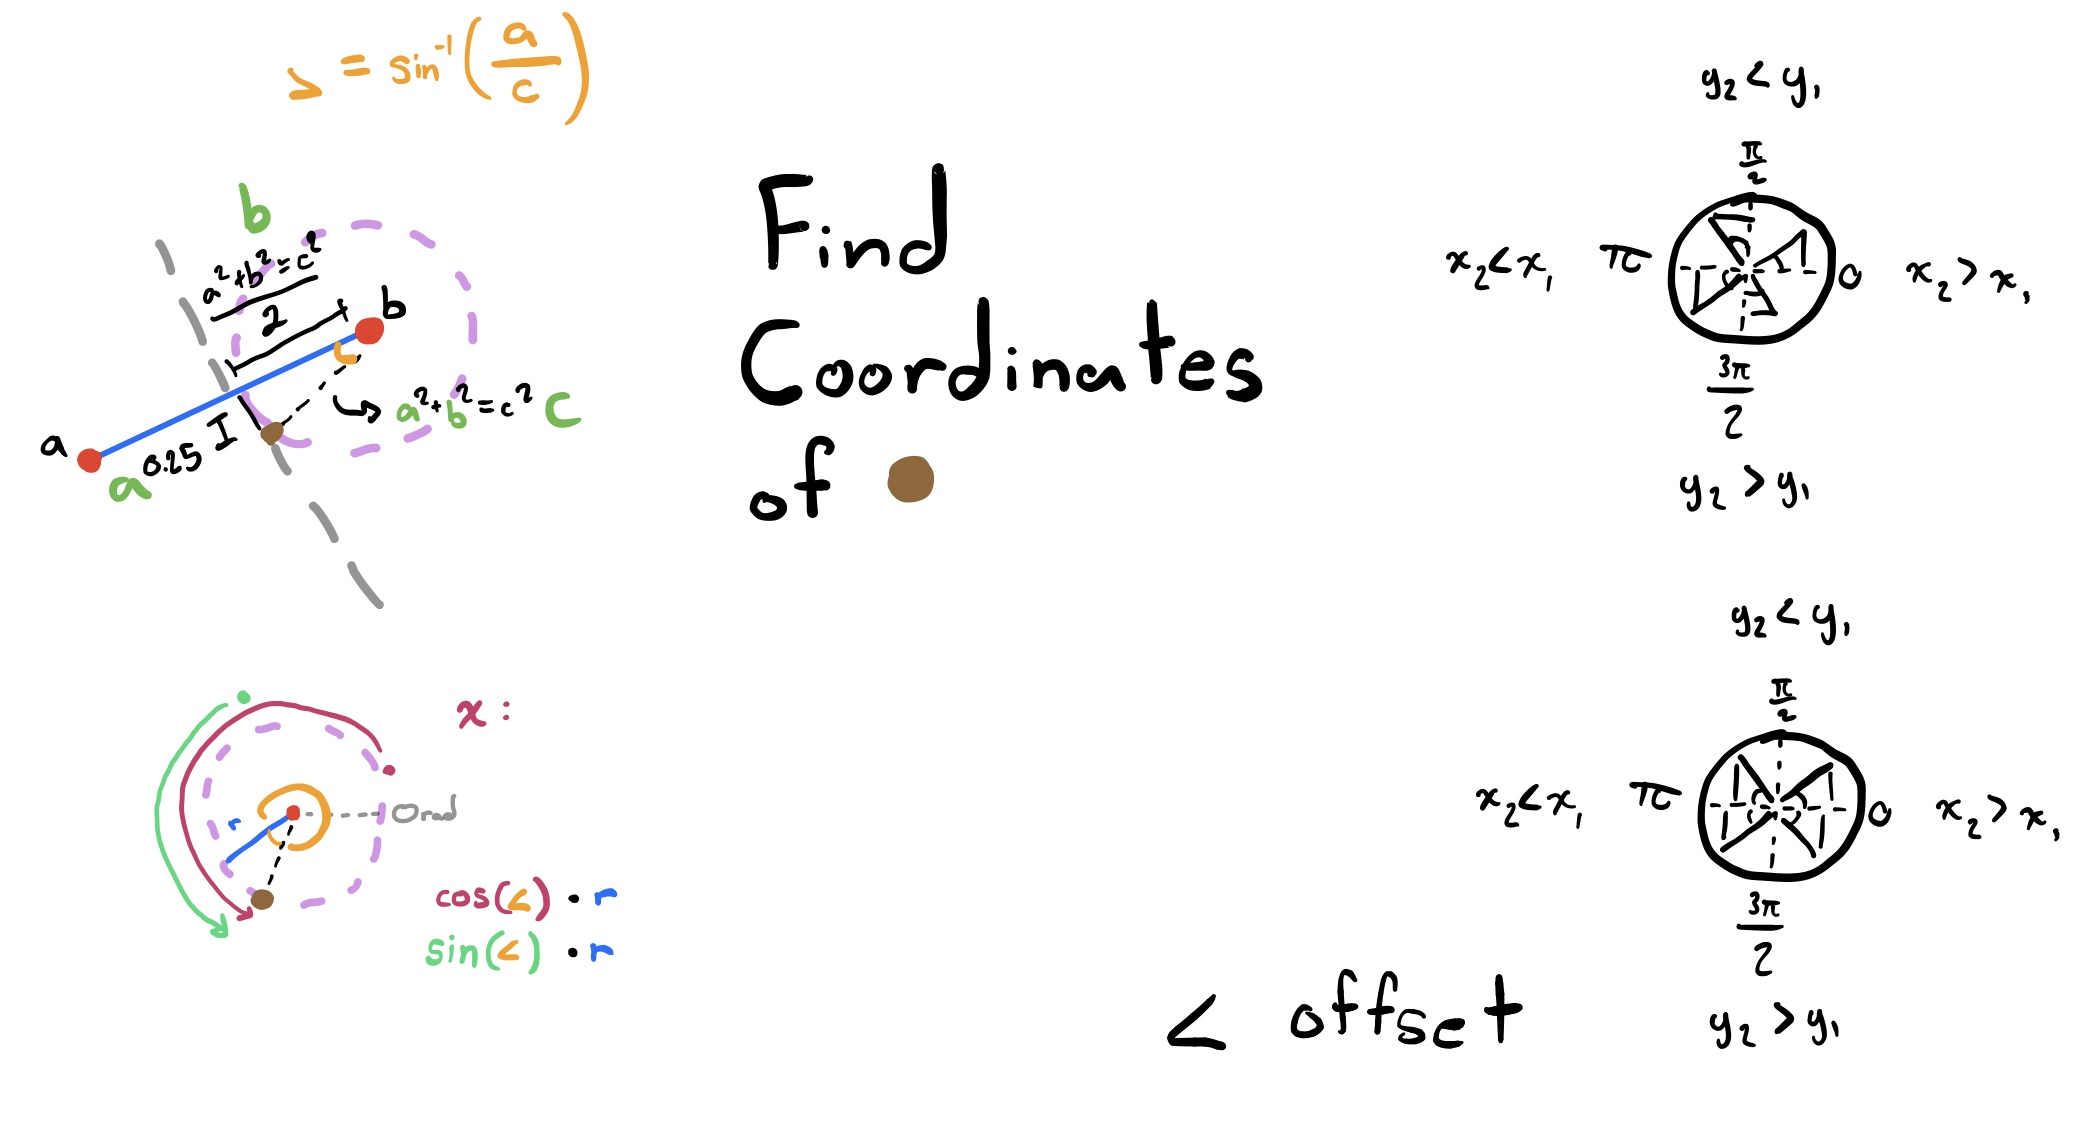
One thing that’s weird is on the left I wrote a^2 + b^2 = c^2 but it’s actually supposed to be like (a.x - b.x)^2 + (a.y - b.y)^2 = c^2. It’s supposed to be distance formula but distance formula is the same as the Pythagorean theorem so eh…
So given points a and b, I want to find the coordinates of the point made by going a set distance (.25) from the midpoint in the line perpendicular to the line found by points a and b (this is the top left drawing). I don’t know how I knew I needed trigonometry, but I needed trigonometry so I needed to find that right triangle. That was easy enough, and I want to find the orange angle. Now I need to actually find that angle, and I can use any trig function I want, but I ended up just using sine. So with the SOH CAH TOA trick, we know that the sine of theta is equal to the ratio of the opposite and he hypotenuse. The opposite is the green a (0.25) and the hypotenuse is the green c. But wait, theta is the angle, we don’t the angle, but we know the ratio (a/c) and we’ll call it r. That means that so far we have sin(x) = r. Luckilly, this is an easy fix with arcsine (inverse sine, whatever). Sine takes an angle and spits back a ratio, so the inverse of that takes a ratio, and spits back an angle. Well, now we got our equation: sin^-1 (r) = x, and angle is found. Now we need to find the distance moved in the x and y. Remember that trigonometry is all about circles, so let’s draw a circle (bottom left drawing). So that’s our unit circle, and by spinning around it the distance of x (the angle), we land at the brown point. Cosine will give us the x distance from 0 and sine will give us the y distance from 0. Since the point is not at 0, we just have to add whatever the point x or y is to offset that 0.
Don’t think you’re done yet. These trig functions work on the unit circle, and that has a radius of one. to fix this we multiply the result of our cosine and sine by the hypotenuse of the triangle (which is the green c, not the blue r that I wrote, you multiply it by the dotted line distance, the drawing is wrong).
We are still not done. This is all assuming the blue line is a line with a slope of zero, the Orad is supposed to be 0 radians, and the line is not there. This means we need to find yet again another offset. Take a gander at the right side of the picture, the bottom one is how I found the offset. The angle offset is the angle of the line, which is just the tangent of the slope (remember tangent takes a ratio and spits back an angle, the slope is the ratio). Computer graphics have a reverse Y axis so multiply all results by negative one. The code for the offset looks like this, might be easier just to look at it then read my bad explanations (remember this is related to the bottom right image):
if (b.x > a.x) // Right
{
  if (b.y < a.y) // Top Right
  {
    angleOffset = -std::abs(std::atan(slope));
  }
  else // Bottom Right
  {
    angleOffset = -(2 * PI - std::abs(std::atan(slope)));
  }
}
else // Left
{
  if (b.y < a.y) // Top Left
  {
    angleOffset = -(PI - std::abs(std::atan(slope)));
  }
  else // Bottom Left
  {
    angleOffset = -(PI + std::abs(std::atan(slope)));
  }
}
So the reason why there are two images on the right is because I thought of it like the top way, but using the angle of the slope of the line was easier so I had to readjust to the bottom way. Notice how the only thing that changes is the horizontal lines in the top become vertical in the bottom.
So finally, take the offset and add the angle to get the desired angle, and finally it will all work. Let’s look at that image again:
As Thanos said:
“All that [math] for a [tiny line]”